The Ring Doorbell is a true innovation in the world of doorbells. Additionally, it provides a live video feed via the smartphone/tablet app, in addition to audio communication with whoever is at the door. Once you have an internet connection, you can see what’s going on at your front door and talk to your visitors from anywhere.
Battery power powers the device. As a result, knowing how to change the battery is an important part of using the Ring Doorbell.
Table of Contents
The Battery
A battery is located inside Ring Doorbell, which powers the device. The manufacturer states that the battery lasts for 6-12 months, which is quite a long time. How often you use this doorbell for video streaming and communication will determine how long the battery lasts. Even though six months is impressive, what happens afterward? Is it necessary to replace the battery?
It’s not necessary to buy a new one, fortunately. Recharging the 6,000mAh battery takes only a few hours. Unfortunately, there’s no battery access from the Ring’s outer shell, so you’ll have to remove the faceplate to remove the battery. Naturally, the faceplate is designed to be sturdy and resilient. Therefore, here’s a tutorial on how to change the Ring’s battery.
Removing the Faceplate
You must access the inner part of the Ring device in order to remove the battery. You will need to remove the faceplate in order to do so. You don’t have to be afraid. It’s very easy to do if you know what you’re doing.
1. Remove the Security Screw
A star-shaped screwdriver was probably the first thing you noticed when you unpacked your Ring Doorbell. To remove the faceplate, you must first remove the security screw using the provided screwdriver. It was obviously done for security reasons, so don’t try to remove the screw with third-party tools and methods, as you may only damage it.
Turn the star-shaped end of the screwdriver counterclockwise until the screw is loose. Even if you remove the screw, the faceplate will remain tightly in place.
2. Remove the Faceplate
When you remove the security screw, you don’t need any tools to remove the faceplate. However, removing the faceplate may require some effort. It was done intentionally to make the Ring Doorbell device more difficult to steal or tamper with.
Put your thumbs on the bottom of the faceplate and your index and middle fingers on the front plate to remove it. The thumbs will be used to push the faceplate upwards, while the middle and index fingers will support it. It is possible for the cover to fall down if you do not provide good support.
With one hand off the faceplate, support the index and middle fingers with the other, grab the cover, and pull it away. Everything should go smoothly if you’ve done everything correctly.
Recharging/Changing the Battery
The battery is located inside the device once you remove the faceplate. If you know what you’re doing, recharging or replacing the battery is also simple.
1. Remove the Battery
A black rectangular tab can be found near the top of the battery. This tab must be pressed in order to remove the battery. The battery can be removed by sliding it out with your thumb and middle finger, while pressing the tab with one of your index fingers.
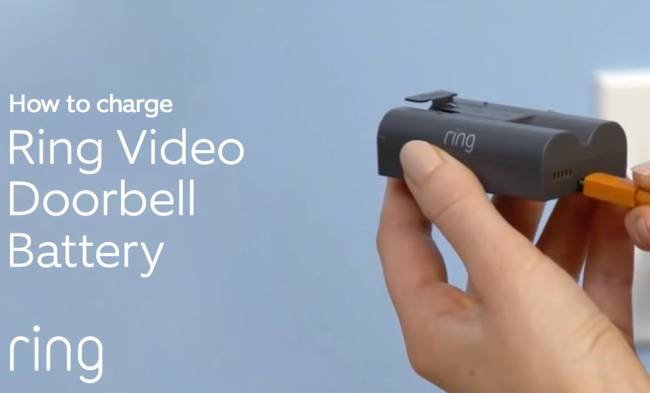
2. Recharge the Battery
In the original packaging of Ring Doorbell, a USB cable should be included. Connect it to the battery like you would a charger for your phone and wait until the battery is fully charged. The process may take several hours, but that’s nothing compared to how long the battery will last.
3. Slide the Battery Back In/Replace It
When the battery is fully charged, slide it back into place by pushing it until the black rectangular tab snaps into place. Make sure you’ve placed the battery correctly before putting on the faceplate. Proceed to the next step if everything is working.
Replacing the Faceplate
Once you’ve replaced the battery, it’s time to replace the faceplate. The process is fairly straightforward and straightforward. As you’ve already removed the plate, you’ll already be familiar with it.
1. Line It Up
Start by taking the faceplate and looking for the plastic hook in the inner, upper part. Place the faceplate so that the hook faces the hole. Place the faceplate at a 45-degree angle.
2. Snap It into Place
The cover can be slid back onto the socket in the previously outlined position by pushing it until it snaps. You have successfully fastened it.
3. Replace the Screw
Using the star-shaped screwdriver provided, screw in the security screw you removed earlier.
You‘re Done!
That’s it, you’ve successfully replaced the battery on your Ring Doorbell. Didn’t seem too complicated, did it?
What do you think of this tutorial? Is it clear and useful to you? Have you been able to remove the battery without any problems? If you have any questions or tips, feel free to leave them in the comments section below.
FAQs
Your Ring doorbell’s battery measurement is updated each time you press the front button. Try ringing your Ring Doorbell 2 a couple of times and the app should update.
To prevent the battery from being damaged, on-board software will prevent the battery from charging if it is too hot or too cold. Make sure the battery is at room temperature before trying to recharge it.